
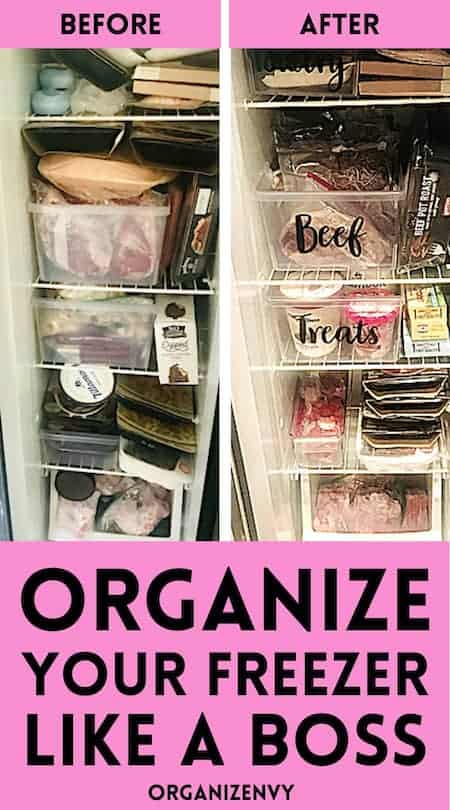
Ever open your freezer door and cringe at the chaos you find? Or have to throw out freezer-burned food that was abandoned at the back of the shelf? I recently did both. It’s not fun!
So, I set myself on a mission to tame my unruly frozen foods once and for all. Here are the quick steps to organize your stand-up freezer…like a boss (I’ll explain each step in further detail):
- Empty the freezer and toss old/freezer-burned food (and vow to never waste food again!)
- Repackage bulk foods into single-meal or single-serving sizes and add the date
- Sort foods by type (meats, poultry, dairy, fruits and veggies, frozen meals, etc.)
- Arrange in clear labeled containers with the oldest foods at the front
Now, let’s get to work! First, PIN THIS IMAGE to save the article for future reference:
Not on Pinterest? No prob! If you’d like to save these tips straight to your email, just enter your info below.
Have tips sent to inbox to save for later:
This post contains affiliate links. As an Amazon affiliate, I earn a commission on qualified purchases at absolutely no cost to you. Please see the Disclaimer for more information.
Step One: Empty and Declutter the Freezer
I’m embarrassed to show my “before” picture, but here’s my freezer when I started this little project:
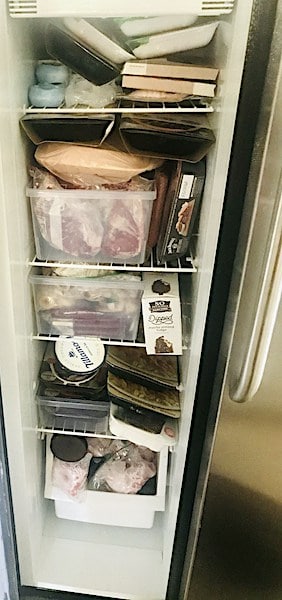
After taking everything out, I was shocked to discover several opened and forgotten tubs of ice cream and packages of frozen fruit, buried in the back of the freezer. They all had developed freezer burn. Not exactly appetizing!
And FYI, in case you’re curious…check out these recommendations from FoodSafety.gov about how long you can safely freeze and refrigerate foods. When in doubt, toss it — there’s no sense risking food poisoning.
After removing everything and tossing anything that looked questionable, I quickly wiped down all of the shelves and got to work on the next step: repackaging.
NOTE: if you have a lot of food to organize, I recommend storing it temporarily in an ice chest or two so it doesn’t thaw out.
Step Two: Repackage Food Into Portions & Add the Date
Freezing large bulk packages of food isn’t efficient, unless you plan to cook it all at the same time. The best solution is to repackage food into single-serving or single-meal sizes.
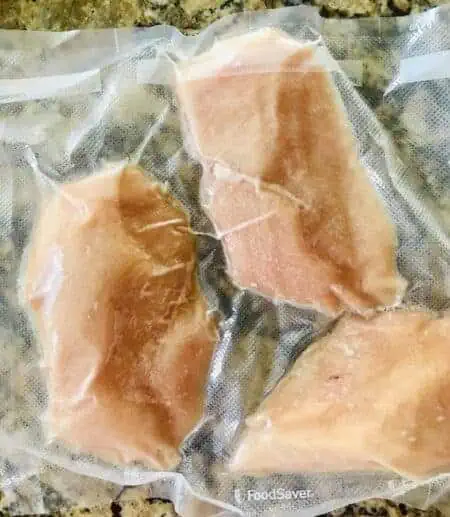
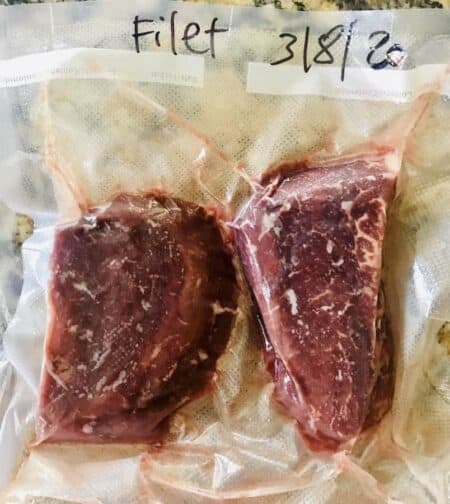
My husband and I bought a FoodSaver vacuum sealing machine for our chicken and beef, and it has been a fabulous investment! It allows us to save money by buying in bulk, then re-packaging food into smaller meal-sized portions.
Also important: it removes the air from around the food, enabling it to last longer in the freezer. Excess air is what causes freezer burn, and freezer burn is what causes wasted food.
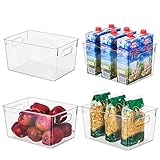
If you don’t have a FoodSaver, just choose a container or bag that the food will fit snugly into. Freezer bags work well, as do stackable, airtight containers like these:
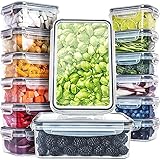
Aim for flat, stackable packages to maximize space in the freezer.
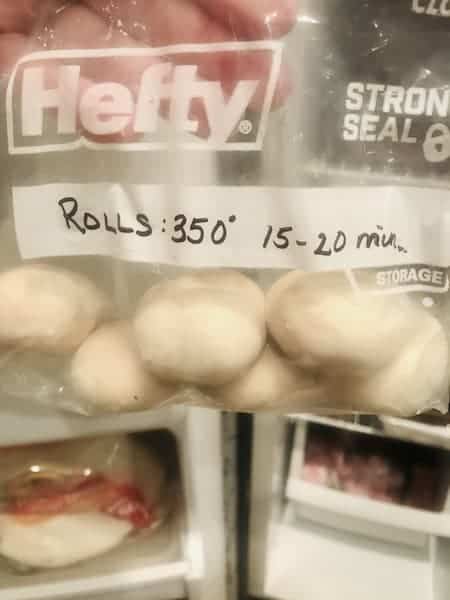
In addition to meat and chicken, you can repackage large bags of frozen fruits and veggies, snacks like pizza rolls, dinner rolls and more. Remove them from their original packaging and store in smaller bags or containers. Tape the cooking instructions to the front of the bag (or write on the front) if needed.
My son drinks smoothies almost daily, so I keep single-portion bags of strawberries and bananas in a freezer bin. He can just grab one and dump it into the blender.
Next, be sure to date the food. For best quality, most frozen foods should be eaten by the three-month mark (they’ll start to show signs of freezer burn after that). Well-packaged food that is kept at 0 degrees can stay good indefinitely, according to FoodSafety.gov.
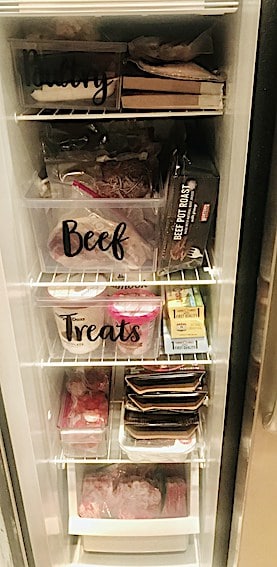
Step Three: Sort Foods By Type
Sorting foods into categories or zones is the best way to organize a stand-up freezer, in my opinion. For me, it was easiest to separate my food into categories like poultry, pork, beef, frozen meals, treats and fruits/veggies.
If you make and freeze soups or stews, that could be another category…along with frozen concentrates, breads, etc. Whatever makes sense for you!
Step Four: Organize Your Stand-Up Freezer With Labeled Containers
Now for the fun part! Measure your freezer shelves and then find or purchase bins to fit. I used a few different types and sizes that we had on hand, similar to these:

Arrange your sorted foods in the bins, placing the oldest dated food in front. When you add new foods, place them in the back of the bin to avoid letting foods expire or get freezer burn.
Finally, add labels to your bins. This is my favorite part of every organizing project! It helps everyone in the household remember to put foods in the correct place, keeping the freezer organized day after day.
Your labels can be as simple as writing with a Sharpie, or you can have a little fun like I did:
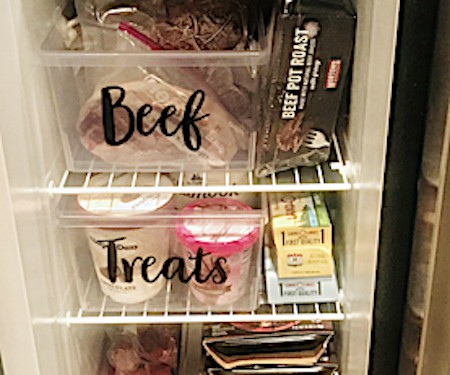
These labels were made on my Cricut with black permanent vinyl.
I love how the final project turned out! (Remember, it’s not about “magazine perfect,” it’s about developing an orderly system that works for you and your household and gives you a sense of peace. That’s all that matters.) Happy organizing!
You might also like:
16 Ways to Make Labels for Organizing Your Home
FAQs: Freezing Food
What foods are NOT freezable?
According to The Kitchn, raw foods with high water content (like melons or grapes and leafy vegetables) do not freeze well at all. Same goes for cheeses, yogurt, and in-shell eggs. Read the full list of non-freezable foods here.
I have also found that freezing sandwich bread and tortillas is not ideal. They never taste quite right when thawed. Better to buy frozen dough to make your own bread or rolls later.
What are the best foods to freeze?
I find that berries and bananas freeze very well for smoothies. You can slice bananas and store them in snack-sized plastic bags to reduce air circulation (which turns them brown).
I love to freeze lasagnas and casseroles in single-portion containers. They make perfect lunchtime leftovers or last-minute reheated dinners when there’s no time to cook.
Another food I freeze all the time is butter. During the holidays, I bake a LOT, so I stock up on butter and freeze it right in the carton. It’s quite easy to soften in the microwave by heating it in 10-second intervals until it’s just right.
For more ideas, check out Taste of Home’s list of 19 foods that freeze well.
How long can I keep foods in the freezer?
According to FoodSafety.gov, foods that are continuously frozen at 0 °F (or below) are safe to eat indefinitely. However, the quality and taste might decline if they are not packaged correctly in airtight containers. For quality purposes, I try to eat my frozen foods within three months.
Check out FoodSafety.gov’s guidelines on cold food storage here.
What is the best temperature for my freezer?
According to the FDA, freezers should be set to 0 °F or below for proper food safety. It’s also important not to overfill the freezer, as this will prevent proper air circulation and may not enable your food to freeze adequately.
Where should I store particular items in the freezer?
Believe it or not, certain areas of the freezer keep items colder than others. The door is the warmest place, so probably not the best for ice cream or foods that soften quickly. I keep breads and rolls and bottles of alcohol in my freezer door.
What causes freezer burn and how do I avoid it?
According to Healthline, freezer burn is caused by a loss of moisture. This can happen as a result of food being frozen for too long, like my forgotten ice cream and berries.
While food with freezer burn is technically safe to eat, it might not taste all that great. I once attempted to bake rolls from frozen dough that had crystallized, and they ended up hard as rocks. Yuck.
I find that repackaging foods in smaller, airtight containers prevents freezer burn the best. The FoodSaver is my favorite tool for this, as it removes all of the air around the food before sealing.
What’s the best way to maintain my freezer?
For expert tips on how to maintain your freezer, check out this video from Sears Home Services:
More Kitchen Organization Articles
I hope you’ve been inspired to organize your freezer — like a boss! For more kitchen organization tips and ideas, check out these articles:
5 Steps to Organize a Side-By-Side Refrigerator
The EASIEST Way to Organize Under the Kitchen Sink
Simple Ways to Organize Kitchen Drawers for Maximum Efficiency
15 Ways to Organize Pots and Pans in the Kitchen
Last update on 2024-04-26 / Affiliate links / Images from Amazon Product Advertising API