

Updated May 2026
If you want to organize your garage on a budget, you’ve come to the right place!
My husband and I completed a HUGE, top-to-bottom garage organization project. We didn’t want to spend big dollars on built-in cabinets, but we needed lots of storage. So, we researched, got a little creative, and came up with affordable alternatives that work great.
I’m excited to share what we did!
And, if you’d like to save these tips for later, just enter your info below. I’ll send them straight to your inbox.
Have tips sent to email to save for later:
This post contains affiliate links. I may earn a small commission on qualified purchases at absolutely no cost to you. Please see the Disclaimer for more information.
1. Declutter the Garage First
Absolutely, without a doubt, the first thing you need to do when you organize your garage is declutter. This space, more than just about any other, tends to be the catch-all for SO MUCH JUNK.
How to Declutter a Garage Quickly
If your garage is really stuffed and cluttered, the fastest way to declutter is to make it a team effort. Have the kids join, and invite a helpful sibling or friend (in exchange for pizza and a beer afterward). And be patient — a full garage could take a weekend or two to fully declutter. But it’ll be worth it in the end!
Then, take it step by step. Go through everything. (And I mean everything! Piece by piece, box by box.) Create piles for things you’ll keep, donate, sell and throw away. My husband and I ended up making multiple trips to the local landfill with all of the trash we found.
Items you’ve decided to donate can be taken to a local Goodwill for a tax receipt, or you can give them to friends/family or call a local charity (like St. Vincent De Paul in the Phoenix area) and schedule a pickup from the curb.
Items you want to sell should be sold QUICKLY. Don’t let them hang around for weeks and months, or you haven’t really decluttered. Hold a garage sale or put them up for sale on Facebook Marketplace, Craigslist or even eBay if they’re vintage or collectible.
2. Sweep, Spackle & Paint
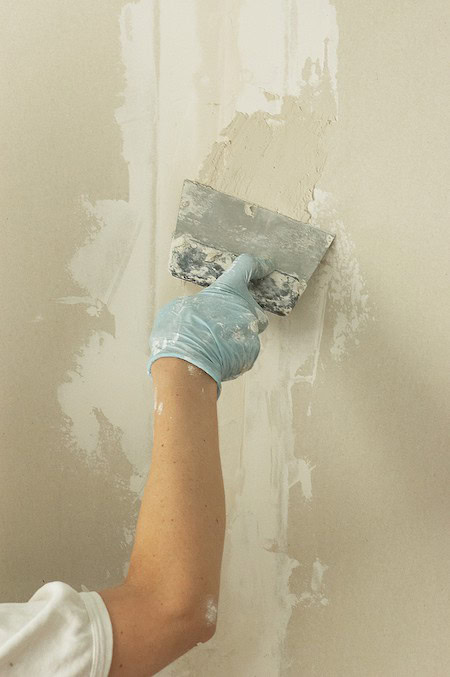
Once you’ve decluttered, take the time to sweep out every corner and crevice. Next, look at the walls. If they’re filled with nail holes, yellowed with dirt or age (or unpainted), I highly recommend some spackle and a simple coat of fresh white paint.
We used exterior satin paint for durability and to make it a little easier to clean smudges. You won’t believe how much brighter your garage will look with a little paint!
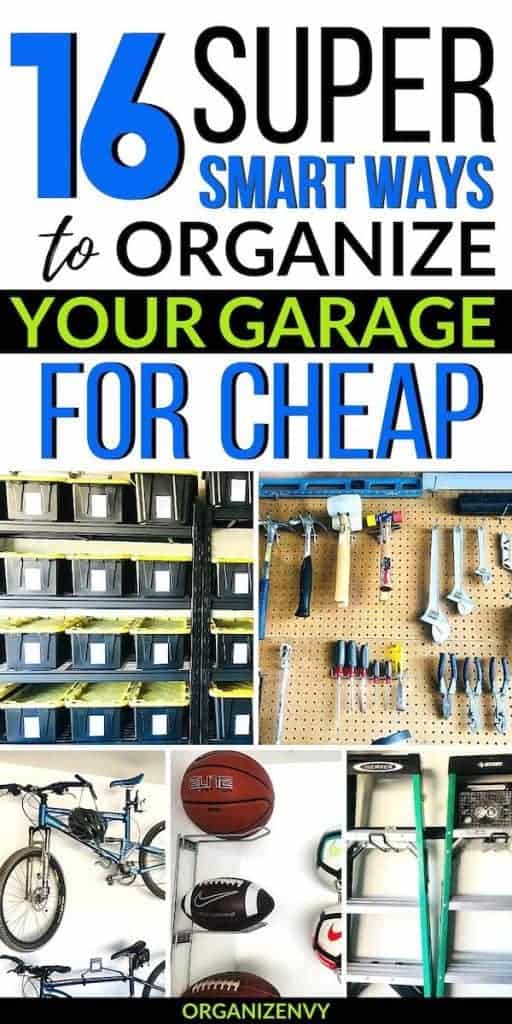
3. Plastic Garage Shelves
A set or two of inexpensive shelves along the wall is perfect for storing tools, toys, athletic gear, camping gear, seasonal decorations and more.
When it comes to affordable garage shelves, you have a range of options. At the cheaper end of the scale are plastic utility storage shelves:
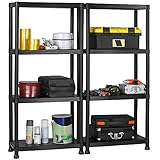
My husband and I used these for years, and I recommend them for the garage… IF: you don’t have a lot of heavy items to store and you don’t live in an extreme climate.
Over time, they will sag if overloaded. And we’ve found that extreme cold and extreme heat make them brittle. Our most recent set did not endure brutal Phoenix summers in the garage very well, so we had to replace them before they collapsed.
4. DIY Wooden Garage Shelves
If you have the tools and the inclination, you can build your own set of wooden garage shelves. All it takes are some 2x4s, a sheet of OSB, and wood screws. (Along with a miter saw, circular saw and other requisite tools.) Check out the full step-by-step on fixthisbuildthat.com.
Wooden shelves will likely hold up better in extreme temperatures than plastic. And, when you make them yourself, you can adjust the length, height and depth to maximize space in your garage.
5. Metal Garage Shelves
My husband and I opted for metal shelves this time around. As DIYers, hobbyists and sports parents, we have a LOT of items to store in our garage. I’m talking tools, gardening equipment, camping gear, sports equipment, holiday decorations and supplies for my husband’s remote control car racing hobby. (Just to name a few.)
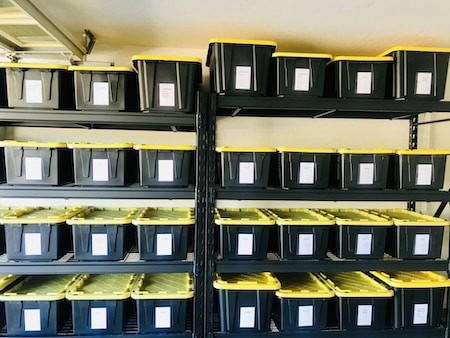
These are really nice, heavy duty steel shelves. It took two of us to assemble them, so prepare for that if you choose this option. They are adjustable to accommodate different sizes of bins and each shelf can hold 1,000 pounds (evenly distributed).
We found ours at our local Home Depot, but Amazon has a set that’s close in size and price:

6. Heavy Duty Storage Bins
Whichever solution you choose for shelving, you’ll want a good set of durable bins to go with it. Temperatures in the garage get hot in the summer and cold in winter, and this can cause cracking and brittleness in thin plastic. (Been there, done that!)
As you can see from the photo of our shelves, we opted for black bins that match. We’ve tried clear bins in the past, but they tend to look messy when you can see the contents.
When it comes to plastic bins, the sturdier the better. We chose this style in 17-gallon and 27-gallon sizes. Keep in mind, the larger the bin the heavier it’ll be. If you struggle with lifting heavy objects, choose smaller tubs.

7. Sort and Group Like Items in Bins
The key to an organized garage is being able to find anything you want in as short a time as possible. When you have a lot of smaller items to organize, sort them into groups with similar items: sports equipment, camping gear, fishing gear, gardening tools, Christmas ornaments, etc.
Next, place sorted items into bins and arrange them in “zones” on the shelves. One zone might be for all seasonal decor, another for tools, a third for outdoors, and so on. I recommend placing less-used or lighter bins like seasonal decor on the highest shelves. Heavy and commonly accessed bins should go on lower shelves.
Finally, you’ll want to label your bins. See the next step!
RELATED ARTICLE:
Why Zones are the Best Way to Organize Your Home
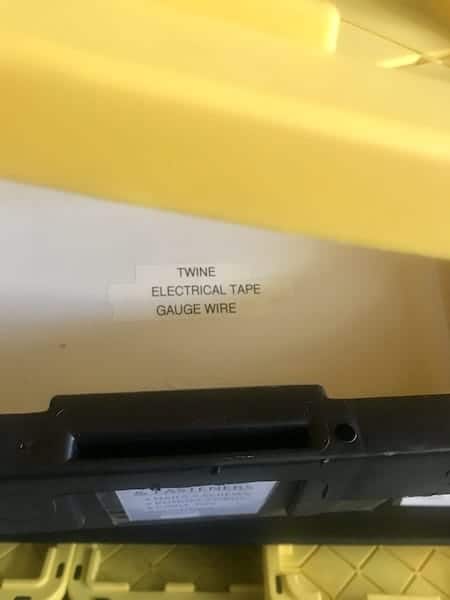
8. DIY Garage Labeling and Inventory System
Labels for your storage bins are a MUST! The more detailed, the better. It’ll save you loads of time looking for that ball pump or set of socket wrenches.
I created my own simple DIY labeling system:
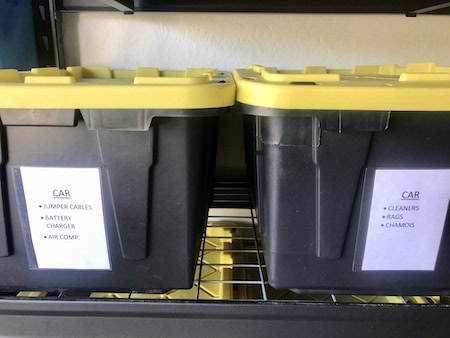
First, I bought clear self-adhesive index card pockets and a set of unlined 4×6 index cards.
Next, I took an inventory of every item in every bin and typed them into a Word document. I added my zones to the top of each label (“CAR” in the photo above) and the individual items bulleted beneath. Then I printed the cards, slipped them into the pockets and affixed them to the bins. Easy, peasy!
By saving each of my cards in a Word document, I also created an inventory of everything in our garage. This helpful document is very handy for insurance purposes! It can be stored in a home management binder in your family command center.
RELATED ARTICLE:
DIY Family Command Center Ideas to Organize Your Life
You can take things one step further by grouping small tools, hardware or hobby supplies in smaller plastic tubs and stacking them in your larger storage bins. Each small tub would get its own label, too:
9. Hang Your Ladders
Getting everything off the floor (as much as possible, anyway) when you organize your garage is really helpful. It makes it easier to sweep and vacuum the floor, and maximizes space. Hanging bulky items like ladders on the wall is a good place to start.

The simplest way to achieve this is with an inexpensive set of ladder hooks. However, my husband and I have a LOT of things to hang, so we bought two Rubbermaid FastTrack Systems:
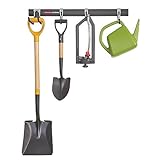
I really like this system! Each set comes with two rails and an assortment of hooks for various garage tools. Once you install the rails to the wall, you snap on the hooks. They can slide back and forth on the rails as needed to fit. AND, you can buy a variety of add-on hooks for power tools, bikes and more.
10. Hang Your Bikes
Bike storage poses a challenge in a garage, particularly if you have three full-sized bikes (like we do) in a small garage (like we have). We needed them to be off the floor and easily accessible.
Our solution: two horizontal bike hooks and one vertical hook (using our Rubbermaid FastTrack system):
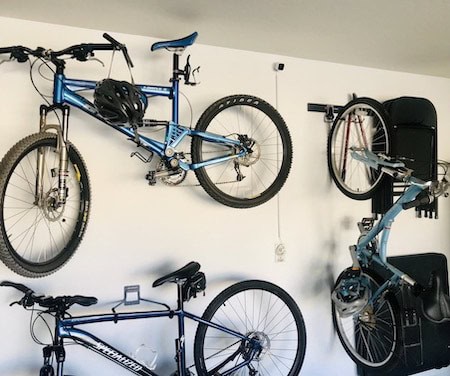
The vertical bike hook provided enough room on the Rubbermaid rail to also hang pruning shears and our folding chairs and tables. Such a great use of empty wall space!
11. Use Wall Mounts for Balls
If you’ve got kids, you’ve likely got a collection of basketballs, footballs and soccer balls. A nice way to get them off the ground but easy for the kids to grab on their way outside is with wall mounts:
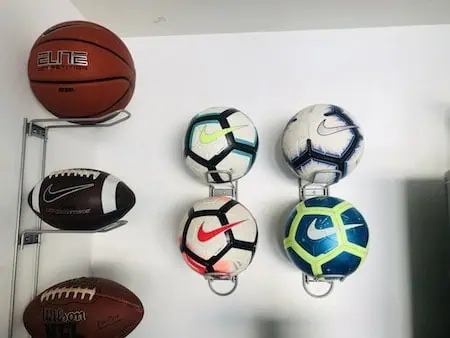
We had just enough space next to the interior garage door to mount these racks so our son always knows where the football is. These would also work in a kids’ bedroom or play room.
12. Use Every Inch of Free Space
When you organize your garage, try to find a use for every inch of space! We have stadium chairs for sports games and concerts that never seemed to have a proper home. When we installed our shelves, I realized these lightweight chairs could be hung right on the side with small bungee cords:
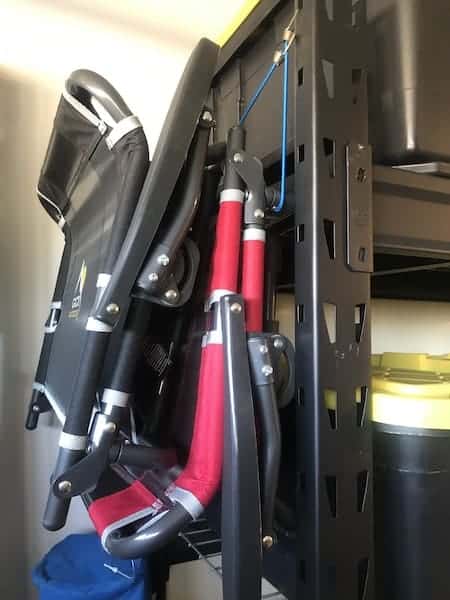
Now these pesky chairs have a place to live, near our other outdoor equipment. No drills, screws or wall hooks needed.
13. Build a DIY Garage Workbench for Tools
A proper workbench for tools can be costly if you buy it in a store. You can build one yourself — cheap — with just a few 2x4s and make it any height, width or depth you like.
My husband built this one himself very simply for less than $50. All straight cuts with a table saw, and he made it tall enough to store our large power tools and air compressor underneath. If you’d like to make a similar one, check out this workbench tutorial.
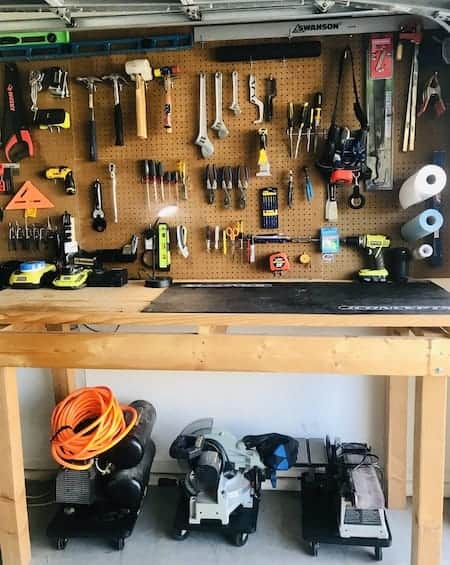
14. DIY Pegboard Tool Organizer
Above the workbench, my husband installed a pegboard to hang and organize his tools. Again, just a few 2x4s screwed into the wall studs is all you need. Then attach the pegboard to the 2x4s and add hooks as necessary.
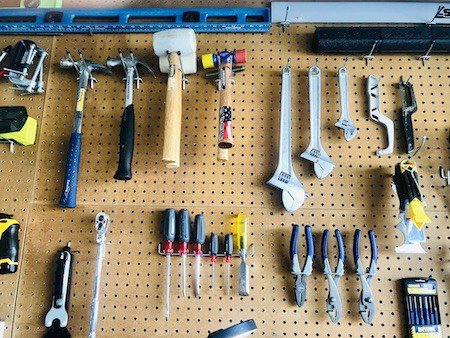
I recommend buying an assortment of pegboard hooks and bins to start, because there are many ways to hang and organize your tools. You’ll probably want to play around with the configuration a bit.
Check out 12 Popular Ways to Organize With Pegboards for more inspiration.
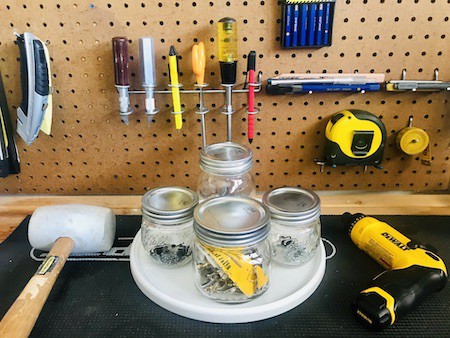
15. Repurpose Jam and Mason Jars for Hardware
This tip is so cheap, it’s free! Keep empty jam, jelly and mason jars and repurpose them to store your bits of hardware: screws, nails, nuts and bolts, washers. You can store them on top of your workbench on a Lazy Susan for easy access:
RELATED ARTICLE:
16. Put Your Heavy Power Tools on Wheels
We’ve always had heavy power tools like table saws and sanders, and we have a big air compressor that weighs a ton. Lugging those out from under the workbench is a pain (and likely to cause back strain!). In a rare moment of brilliance, I realized we could eliminate the hassle by putting these tools on wheels:
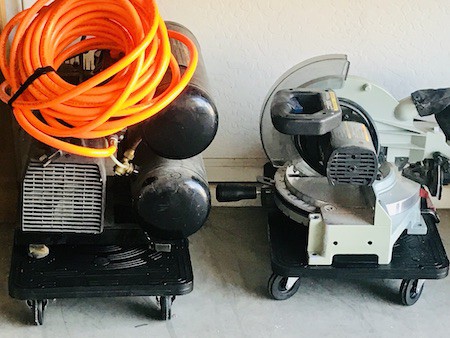
These simple moving dollies are PERFECT. They slide in and out with zero effort. No more back strain!
Organize Your Garage on the Cheap: Final Thoughts
Looking at my garage now, I’m beyond thrilled with the final project! It was definitely worth the hard work, and I know it’ll never be a cluttered mess again. I’ve seen to that!
I hope you’ve found some inspiration to tackle your own garage organization project. As you can see, it doesn’t have to cost a fortune!
Organizing a Garage: Frequently Asked Questions
Start with a full purge. Pull everything out and sort into keep, donate, and trash. Don’t buy any storage until you know exactly what you’re keeping. Most people are surprised how much space they gain from decluttering alone.
Wall-mounted systems (pegboards, slat walls, and track systems like Gladiator or Rubbermaid FastTrack) maximize floor space and are easy to reconfigure. For most garages, a combination of wall storage for tools and clear stackable bins for bulk items covers 90% of your needs.
Overhead ceiling storage racks are an underused option. They’re ideal for seasonal items, bins and sports equipment. Also consider freestanding shelving units. They can store items in any open space.
The “zone” system works best. Designate areas for tools, sports gear, lawn and garden, and automotive supplies, and use labels. When everything has a home, it’s easy to put back. A quick 10-minute reset monthly prevents drift.
Use open shelves for everyday-access items (tools, sports gear). Closed cabinets or bins work well for chemicals, paints and anything you want to keep clean or child-safe.
Related Organization Articles
How to Declutter Your Garage Now
Brilliant Ways to Organize Tools on a Pegboard
The Best Wrench Organization Ideas for Tidy Tools
10 Game-Changing Ways to Store Sports Gear
17 Best Ball Storage Ideas to Try Now
15 Brilliant Backyard Organization Ideas
45 Ways to Organize Your Car That Will Captivate
Clean & Organize Your Glove Box in 3 Steps
The BEST Road Trip Organization Tips
Organize Your Home Without Spending a Dime
Last update on 2026-07-22 / Affiliate links / Images from Amazon Product Advertising API